.png)
AWS Lambda gained a lot of popularity throughout the last few years, with many engineers adopting it to implement microservices and APIs for a fraction of the costs of traditionally hosted systems with superior scaling capabilities. But did you know that you can also run full-fledged Node.js web apps with React frontends on AWS Lambda without the need for any dedicated EC2 instance?
What we’re covering here
- We’re creating a Universal App (aka an isomorphic JavaScript App) with server-side rendering with a dynamic configuration context passed from the backend to the browser.
- The app runs on AWS Lambda enabling blazing fast response times at low costs. Static code and assets are hosted on S3 for the best performance and lowest overhead. This allows you to seamlessly scale your website from simple personal use cases to pages with millions of monthly visitors.
- We’ll write our code in TypeScript using Babel 7 and Webpack 5.
- We’ll keep things lightweight: no redux, react-router, sass, less or any other 3rd party dependencies you might not want or need. The only hard dependencies are react and react-dom!
- This article is based on a React boilerplate that is designed to be simple & self-contained; no additional setup steps necessary other than running a single command: npx sls deploy.
- We also have a working local environment, unit tests using Jest as well as source maps for easier debugging.
This blog post should allow you to get your own web app up and running in about 15 minutes and doesn’t require any knowledge other than a basic understanding of AWS Lambda and some proficiency in JavaScript/TypeScript.
Why not Create React App, Next.js, or Gatsby?
Everybody working with React.js has probably used CRA before, so it shouldn’t need any introduction. Next.js and Gatsby are both great frameworks for building complex, interactive React applications and both provide tons of plugins to customize them to your needs. And then there are dozens of others that try to simplify web app development. So why another one?
See, I actually don’t want to introduce a new framework. In my career, I had the opportunity to use many different ones for various purposes and one thing all of them have in common is that at one point or the other you’ll have to take the rails off and “eject” from them. Instead, I often found myself copy-pasting from previous projects to have a quick starting point for new ones. This is how this boilerplate was born. It is designed to get you started with minimal setup and minimal dependencies, similar to creating a project with Create React App. And this is also the reason why I intentionally did not include any production third-party dependencies besides React itself. This allows you to plug in Redux, Recoil, Zustand, React Router, Styled Components, TailwindCSS, or whatever else you prefer to use.
The Serverless Framework
The boilerplate makes use of the fantastic Serverless Framework. If you aren’t familiar with Serverless yet, I strongly suggest giving it a try! You’ll love the simplicity of how to create and manage microservices. Check out the AWS introduction for the first steps before trying to go all-in with this blog post here.
The Boilerplate
The boilerplate project itself is available on GitHub: https://github.com/arabold/serverless-react-boilerplate
We use this as our starting point for creating a new React application. In this blog post, I’m going to walk you through how to set up and customize your first application.
Create Your App
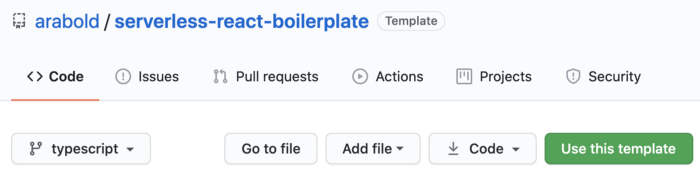
To get started create a new repository based on the boilerplate by opening up the repository in your browser and selecting “Use this template”. This will create a new repository based on the boilerplate in your own account and allows you to make changes to the codebase and push them back up again.
After checking out your newly created repository locally, install all necessary dependencies:
That’s it! This will include a local copy of the Serverless Framework and everything else you’ll need to get started. We can deploy this app right away and it should work out of the box.
However, before we deploy anything, let’s make one simple change:
serverless.yml
Open up serverless.yml in your favorite editor and change the service name from “serverless-react-boilerplate” to whatever you want to call your new app. This name will be used for your AWS Lambda functions and S3 bucket and cannot be changed afterward anymore without fully removing and redeploying your app.
Leave the rest of the file untouched for now.
Our first deployment!
Now it’s time for trying things out! Let’s deploy our new app to AWS. If you haven’t used the Serverless Framework before, make sure to configure your AWS credentials, so it can create the necessary resources for you.
The boilerplate is set up with simplicity in mind, so all you need to do is run a single command:
This will instruct the Serverless Framework (the sls command-line interface) to deploy your local code to your own AWS account using us-east-1 as the default region. Building your codebase should take a couple of seconds, followed by the deployment itself which can take up to a minute. The output will look somewhat like this:
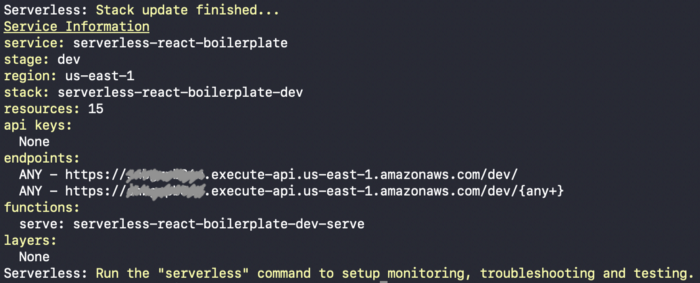
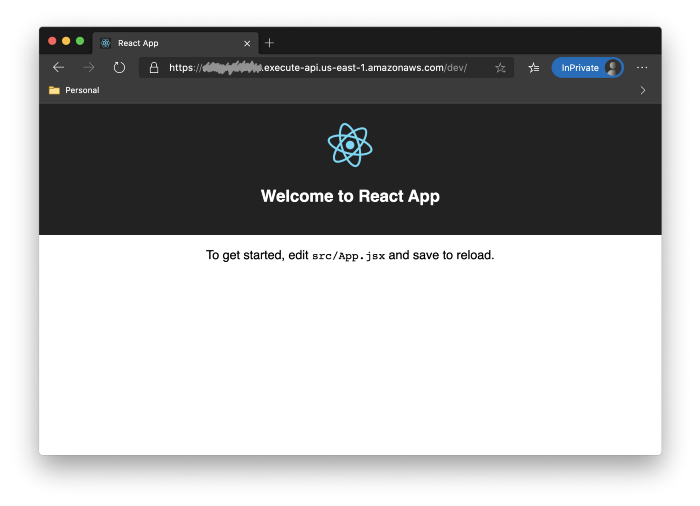
The interesting information is the first endpoint URL. This is your deployed website! Open the URL in a browser of your choice (including the /dev/ path of the URL):
So, what happened?
The deploy command takes care of two things:
- Your server-side JavaScript/TypeScript code is transpiled, bundled, and then deployed as a new AWS Lambda function that performs the server-side rendering of your site.
- Your client-side JavaScript/TypeScript code is also transpiled, but this time for running in reasonably modern web browsers. Then it is copied together with all other static files like images and fonts to S3 and served to your users from there.
All this happens automatically when you run npx sls deploy. Subsequent runs will simply overwrite the previous version. For additional details refer to the “Deep Dive” sections below.
Updating Your Website
Now that our website is up and running we can make some changes to it. Open up ./src/browser/App.tsx and start editing the content. For larger projects, I suggest creating subfolders to keep your stuff organized.
The backend code needed for server-side rendering is located in ./src/server. The only content you might need to customize is the configuration as well as the HTML template (see below). The rest of the files should be left alone.
Shared components are placed in ./src/components but you can move them to another location if you prefer. For now, the only component is the ConfigContext and the corresponding useConfig hook that’s used to access the shared configuration options.
Configuration
The frontend (./src/browser) and backend (./src/server) of your website share a common configuration. This is useful if you want to inject information into your application that is only available in the backend such as AWS Lambda environment variables.
To add your own configuration options edit ./src/server/config.tsx, but be careful to leave the existing ones unchanged. Also, please note that any values you store in the configuration are available in the user’s browser in plain text! So, do not under any circumstances store passwords or other secrets in the configuration! Please always follow security best practices.
HTML Template
Another file you might be interested in updating is ./src/server/html.tsx. It contains the HTML code that will encapsulate your actual React app. Most of the time you can leave this file alone and I always suggest using React to update your DOM instead of making changes to this file directly.
Be careful not to change or remove the <div id="root"> element as well as any of the script tags as those are required for properly embedding your React application.
Stylesheet
A default stylesheet is available at ./src/browser/App.css but for more advanced designs I recommend the use of libraries such as Styled Components or TailwindCSS. The boilerplate was designed to not restrict you in any way and let you choose the best tool for the job.
Public Folder
The ./public folder of the repository contains static files that should always be uploaded to your S3 bucket. We use it for the favicon and our manifest.
Fonts & Images
While you could put fonts and images into the ./public folder and load them from there, I recommend placing them into your ./src/app folder instead. You can then use JavaScript’s import statement to load them and embed them directly in your app:
This keeps your asset files next to the components that use them and has the added benefit that assets can be optimized by Webpack.
State Management
The boilerplate has no dependencies on Redux, Recoil, Zustand, or any other state management frameworks. Again, I kept the boilerplate mostly free of any opinionated solutions so you’re free to choose your own one. If you care for my opinion though, I’d love for you to check out my other blog posts on this topic:
Running Locally
While doing changes to your website you might want to see the results in real-time without having to deploy your changes first. Start the server locally using the following command:
The test server will serve your website at http://localhost:3000/. Assets will be served by a second server instance running at http://localhost:8080, similar to how S3 is used during an actual deployment.
While running, your website will automatically reload if you make changes to the code.
Testing
Another critical tool for production-ready websites is the ability to test them properly. The boilerplate comes preconfigured with Jest, one of the most popular JavaScript testing frameworks.
To run your tests simple execute the following command:
This will locate all *.test.ts and *.test.tsx files in your ./src folder and execute the defined test suites. Out of the box, the boilerplate only contains a single test ensuring that your website is actually rendering.
For full end-to-end testing of your web application, I recommend test suites such as Cypress.
Deep Dive: Understanding the Deployment
Though we use the same source code for both the server-side and client-side rendering, the project will eventually be packaged into two distinct bundles:
- The backend code is running on AWS Lambda. The main entry point is ./handler.ts It contains the handler function that is invoked by AWS Lambda. This file shouldn’t require any changes. All it does is importing ./src/server/render.tsx which performs the actual rendering of the HTML output that is sent to your website visitors. The bundling of these files is controlled by webpack.server.config.ts and optimized for Node.js 12, the latest version supported on AWS Lambda as of this writing.
- Frontend code is hosted in an S3 bucket and loaded by the browser. The main entry point is ./src/browser/index.js. It's packaged using the webpack.browser.config.js, this time optimized for modern web browsers. The output files will have their content hash added to their names to enable long-term caching in the browser.
To make changes to your backend build process update .babel.config.js and .webpack.server.config.js in your project root folder. Webpack is preconfigured to handle .js, .jsx, .ts, as well as .tsx source files. For .css files, we use the null-loader to exclude them from server-side builds. Images, fonts, and other binary files are using the url-loader to load them from our S3 bucket.
To make changes to the frontend build process update the .webpack.browser.config.js in your project root folder. It looks quite similar to the server configuration file with a couple of additional tweaks.
Deep Dive: Understanding serverless.yml
The serverless.yml creates all the necessary resources for us. All values have been chosen carefully but feel free to change them where you see fit. But before you make any changes, please make sure you understand the Core Concepts of the Serverless Framework.
- runtime: We can use whatever Node runtime is offered by AWS at the time. Here we go with Node.js 12 which is the latest one available for now. Our Babel setup (see .babelrc in the project root folder) can be configured to build your code for any desired platform version, but using the latest Node.js version usually gives better stability and performance.
- region: During deployment of a Serverless project, you can always specify the desired target region in the command line. Here you can set a default in case us-east-1 doesn’t match your needs.
- stage: Serverless also has the concept of development and production stages. Here we use dev as our default stage name. Read more about Managing Stages and Environments on Serverless.com.
- memorySize: A website usually shouldn’t need a lot of memory for server-side rendering. Using less memory is cheaper but will negatively impact the execution performance of AWS Lambda. We go with 512 MBytes as the default as this seems to give us the best compromise between performance and costs. Increase it gradually if necessary.
- timeout: A six-second timeout should be more than sufficient. You really don’t want a website to load for more than 6 seconds, do you?
- logRetentionInDays: It’s a good practice to keep logs of your backend in case you need to debug issues or investigate some past incidents. By default, AWS Cloudwatch will keep your logs forever, often occurring unnecessary costs and cluttering the AWS console. Set the log retention to 7, 30, or 90 days, or to whatever you feel is appropriate for your use case.
So much for the common configuration options. We also make use of the following Serverless plugins:
- Webpack Plugin — We use Webpack for packaging our sources.
- Offline Plugin — The Serverless Offline Plugin allows you to run Serverless applications locally as if they would be deployed on AWS. This is especially helpful for testing web applications and APIs without having to deploy them first.
- Scripts Plugin — Run shell scripts as part of your Serverless workflow
- S3 Deploy Plugin — Deploy files to S3 buckets. This is used for uploading static content like images and the generated index.js.
The rest of the file covers the creation of our resources: Besides the Lambda function itself, we create an API gateway resource ApiGatewayRestApi for serving our web application via HTTPS and an S3 Bucket DistBucket which reconfigure for CORS, allowing access from our API gateway.
What’s next?
Hopefully, the boilerplate has proven helpful to get started with React.js on AWS Lambda quickly. However, this is only the beginning. As you undoubtedly noticed, a lot of things are still missing and will require additional setup:
- Add React Router (or React Wouter if you prefer a more minimalist solution) for navigating between screens. There’s a Pull Request available to get you started.
- Configure API Gateway and Route 53 to use a custom domain name for your website, e.g. using the Serverless Domain Mapper Plugin.
- Provide an API to communicate between frontend and backend, e.g. to load records from a database. You might want to give AWS AppSync a try if you’re starting a new project from scratch.
- Consider deploying your Lambda to multiple regions in parallel and add a CDN in front of your S3 bucket for additional performance.
Meet our Guest Blogger
André is developing software professionally for more than 25 years. Born and raised in Germany, he moved to sunny Southern California about 10 years ago. Since then he has been a co-founder of an NLP marketing platform for the entertainment industry, launched an IoT healthcare product for the elderly in the United Kingdom, a digital payments company in Mexico, a portfolio of IoT-based applications for international ship tankers, developed an ESG product for forecasting CO2 emissions of new oil and gas fields, and an artificial intelligence platform that aims to disrupt the $350B customer call center industry. Currently, André works as a Venture CTO at BCG Digitial Ventures and acts as a technology advisor for several tech startups.
During the pandemic, André also picked up some home improvement skills. What started as "just gonna paint this wooden board" ended up in reconstructing a balcony and remodeling an entire basement floor to ceiling. All thanks to YouTube and a shiny new set of power tools.