Introduction
Masashi here, creator of the Serverless Alexa plug-in.
Serverless and IoT go hand in hand, and it's easy to use the Serverless Framework to develop AWS Lambda functions for Alexa Skills.
Unfortunately, you can't control Alexa Skills with the Framework, which was a bummer to me because I found the Alexa Skills Kit webapp and ask-cli didn't have the simplicity I'd come to love with the Serverless Framework.
But! Luckily, the Serverless Framework has a great plugin system. I decided to solve this little problem with the power of the community!
Overview
The Serverless Alexa Skills Plugin lets you integrate Alexa Skills into the Serverless Framework. We can now control the manifest and interaction model of Alexa Skills using sls command and serverless.yml!
How to use it
Installation
The plugin is hosted by npm:
$ npm install -g serverless
$ sls plugin install -n serverless-alexa-skills
Get your credentials
Login with Amazon is an OAuth2.0 single sign-on (SSO) system using your Amazon.com account.
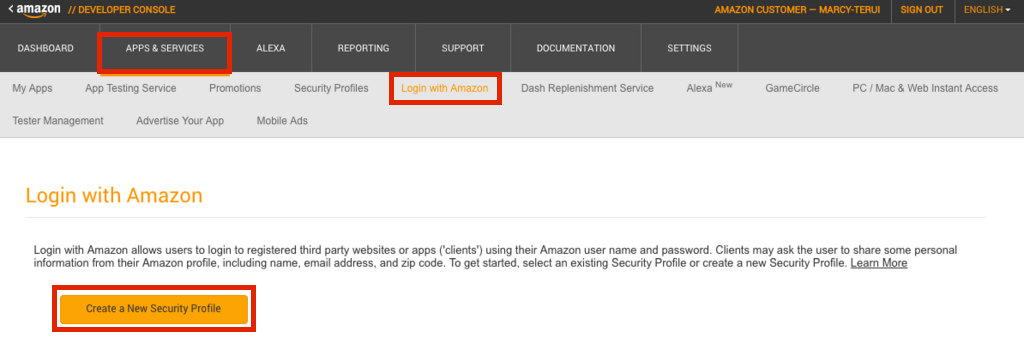
To get your credentials, log in to the Amazon Developer Console, go to Login with Amazon from APPS & SERVICES, and then Create a New Security Profile:
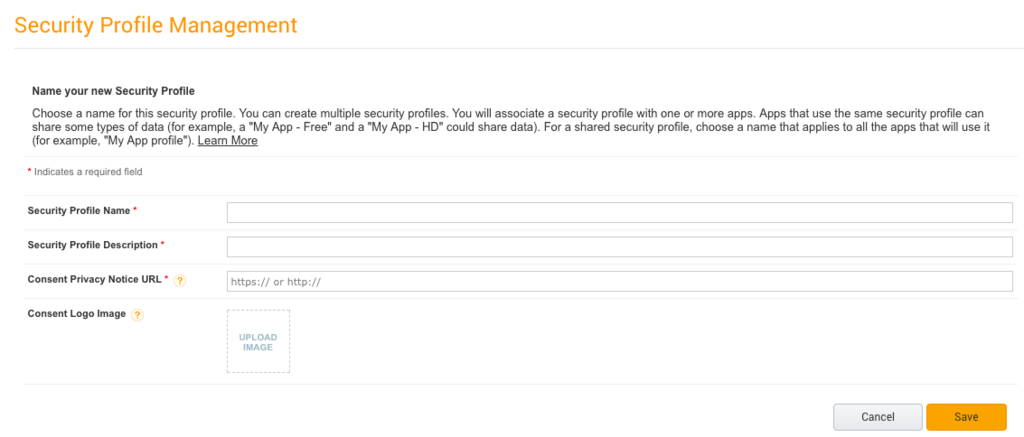
For following columns, you can enter whatever you like:
Go to the Web Settings of the new security profile:
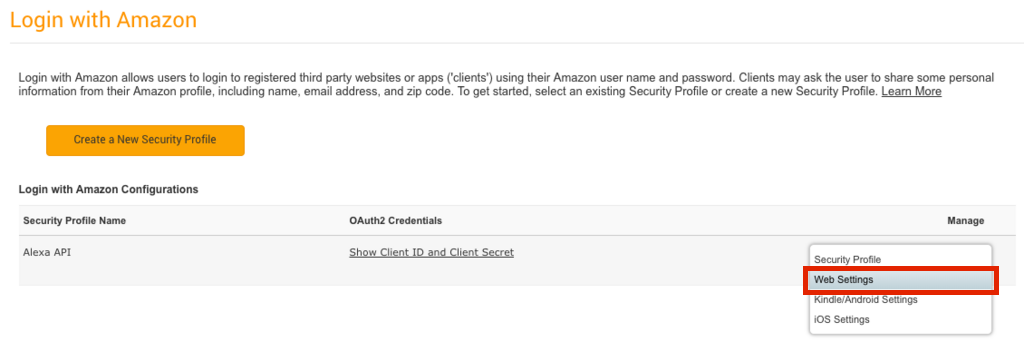
Allowed Origins can be empty. Enter http://localhost:3000 in Allowed Return URLs. This port number can be changed with serverless.yml, so if you want to change this, please do so:

Remember your Client ID and Client Secret of the new security profile, as well as Vendor ID. You can check your Vendor ID at here.
You only need to do this process once. You can continue to use the same credentials as long as you use the same account.
The troublesome browser click-work is over! 👏 Let's move on to the sls command.
Put your credentials into the Framework
Write the Client ID, Client Secret, and Vendor ID to serverless.yml. It is good to use environment variables as it is shown below.
Change the port number with Allowed Return URLs of Login with Amazon, add localServerPort, and write the port number:
provider:
  name: aws
  runtime: nodejs 6.10

plugins:
  - serverless-alexa-skills

custom:
  alexa:
    vendorId: ${env:AMAZON_VENDOR_ID}
    clientId: ${env:AMAZON_CLIENT_ID}
    clientSecret: ${env:AMAZON_CLIENT_SECRET}
Then, execute the following command:
$ sls alexa auth
This command opens the login page of Amazon.com in your browser. You will be redirected to localhost:3000 after authenticating. If the authentication is successful, you'll see the message: "Thank you for using Serverless Alexa Skills Plugin!!".
note: The security token expires in 1 hour. Therefore, if an authentication error occurs, please re-execute the command. I'm planning to implement automatic token refreshing in the future.
Create your skill
Let's make a skill!
To start, execute the following command:
$ sls alexa create --name $YOUR_SKILL_NAME --locale $YOUR_SKILL_LOCALE --type $YOUR_SKILL_TYPE
These are descriptions of the options:
- name: Name of the skill
- locale: Locale of the skill (
en-USfor English,ja-JPfor Japanese and so on) - type: Type of the skill (
customorsmartHomeorvideo)
Update the skill manifest
A manifest is initially set for the skill. You can check the manifest with the following command:
$ sls alexa manifests

Serverless:
------------------
[Skill ID] amzn1.ask.skill.xxxxxx-xxxxxx-xxxxx
[Stage] development
[Skill Manifest]
manifest:
  publishingInformation:
    locales:
      ja-JP:
        name: sample
  apis:
    custom: {}
  manifestVersion: '1.0'
Copy [Skill ID] and [Skill Manifest] and paste it to serverless.yml as below.
custom:
  alexa:
    vendorId: ${env:AMAZON_VENDOR_ID}
    clientId: ${env:AMAZON_CLIENT_ID}
    clientSecret: ${env:AMAZON_CLIENT_SECRET}
    skills:
      - id: ${env:ALEXA_SKILL_ID}
        manifest:
          publishingInformation:
            locales:
              en-US:
                name: sample
          apis:
            custom:
              endpoint:
                uri: arn:aws:lambda:region:account-id:function:function-name
          manifestVersion: '1.0'
Execute the following command to update the manifest after updating your serverless.yml (or you can use the --dryRun option to check the difference between the local setting and the remote setting without updating):
$ sls alexa update
You can see the format of the manifest here.
Building the interaction model
The skill does not have an interaction model at first, so you'll need to write an interaction model definition to serverless.yml.
Like this!
custom:
  alexa:
    vendorId: ${env:AMAZON_VENDOR_ID}
    clientId: ${env:AMAZON_CLIENT_ID}
    clientSecret: ${env:AMAZON_CLIENT_SECRET}
    skills:
      - id: ${env:ALEXA_SKILL_ID}
        manifest:
          publishingInformation:
            locales:
              en-US:
                name: sample
          apis:
            custom: {}
          manifestVersion: '1.0'
        models:
          en-US:
            interactionModel:
              languageModel:
                invocationName: PPAP
                intents:
                  - name: PineAppleIntent
                    slots:
                    - name: Fisrt
                      type: AMAZON.Food
                    - name: Second
                      type: AMAZON.Food
                    samples:
                     - 'I have {First} and {Second}'
You can see the format of the interaction model here.
Execute the following command to build the model after updating your serverless.yml (and you can also use the --dryRun option with this command):
$ sls alexa build
Then, you can check the model like so:
$ sls alexa models

Serverless:
-------------------
[Skill ID] amzn1.ask.skill.xxxx-xxxx-xxxxx
[Locale] ja-JP
[Interaction Model]
interactionModel:
  languageModel:
    invocationName: ppap
    intents:
      - name: PineAppleIntent
        slots:
        - name: First
          type: AMAZON.Food
        - name: Second
          type: AMAZON.Food
        samples:
         - I have {First} and {Second}
That's it!
There are a few more steps needed in order to completely publish skills, so I'm planning to do further integrations with the Alexa Skills Kit in the future. It's still pretty great to be able to integrate manifests and models, since we update those many times as we develop. All the better if we can manage them with the source code of our Lambda functions!
Summary
Now, we can completely manage our Lambda Functions and Alexa Skills with Serverless Framework + Serverless Alexa Skills Plugin!
If you have any comments or feedback, please create an issue or send a pull request. I always welcome them 🍻

