.png)
Due to the latest advancements in the Deep Learning ecosystem like improved frameworks, production ready architectures, pre-trained models ...etc. building a decent model is easy (not really 😅), but the biggest question that arises afterwards is “I have built a model, what’s next ?”
A model is only as good as what use it can provide to the customers, so in order to make a model useful it should be served to millions of users in a very cost effective way. Now how do we serve or deploy a model to users? Easy, we could get on demand data, storage and computing power by leveraging any of the common cloud platforms like AWS, GCP, Azure …etc. For this tutorial we are going with AWS cloud platform.
Best things in life come for free, but not AWS resources. Cloud pricing even though very competitive can tend to stand as a hurdle for engineers to build out scalable and resource intensive products. Setting up dedicated instance infrastructure when building your MVP with AI capabilities is a suicide mission, because we have no idea about user retention, product acceptance in the market, revenue generation from the product, etc. Building up this stack using dedicated cloud infrastructure from scratch is an expensive task due to several reasons, which we will be discussing soon.
So a typical deep learning API stack would look as follows:
As we can see this is a very complex stack and the drawback of such infrastructure is that:
1. We have to manage the cluster — its size, type and logic for scaling
2. Client has to pay for idle server power
3. We have to manage the container logic — logging, handling of multiple requests, etc
4. Requires a lot of expertise in Cloud Architecture
To solve the cons of a dedicated cloud infrastructure, cloud providers came up with serverless services (eg: AWS Lambda) whose main attractions are that, we don't have to manage any servers and we are billed on the number of function execution rather than on an hourly basis (1M free requests per month).
Due to the latest advancement in the serverless ecosystem like container support, memory improvement, etc, this has opened up a lot of opportunities for all the Deep Learning practitioners to deploy models as an inference API using Lambda stack.
So today we will be deploying a PyTorch model as a Serverless API leveraging Lambda, ECR and Serverless framework.
So if you want to jump right into code please check out my GitHub repo
In this tutorial, we will be deploying a simple text classification model using BERT🤗 which classifies daily user transaction logs to classes like ‘food’, ’transport’, ’bills’..etc and serves it as an API. I will be covering topics in detail as follows:
1. A brief explanation about all the resources being used
2. Building our model inference pipeline
3. Creating a Lambda function using serverless framework
4. Combining our inference pipeline with the lambda function
5. Build a docker image and testing our API locally
6. Tagging and deploying images to AWS ECR
7. Deploying lambda functions using the image deployed in AWS ECR
8. Finally, model inference using the serverless API
- AWS Lambda Service — “With great power comes less responsibility”
AWS Lambda is basically a service which lets you run functions on cloud servers without actually managing any servers. Managing servers is never an easy task as mentioned earlier. With serverless we don’t have to think about scalability and robustness of our infrastructure, since AWS takes care of it for us.
To communicate with AWS resources like ECR, S3 ..etc programmatically we need to install AWS CLI - Serverless Framework
Serverless framework lets you quickly construct and deploy serverless applications using services like AWS Lambda, S3, Amazon API Gateway etc. This framework leverages AWS CloudFormation to fire up all the resources required to build our inference API using a YAML configuration file.
To install serverless framework please follow along the instructions and make sure to configure serverless with your AWS secret access keys following the guide. - AWS ECR — Docker 🐳 is all you need
Amazon Elastic Container Registry (ECR) is a fully managed container registry that makes it easy to store, manage, share, and deploy your container images and artifacts anywhere. So we basically build a docker image of our classifier pipeline and store it in AWS ECR.
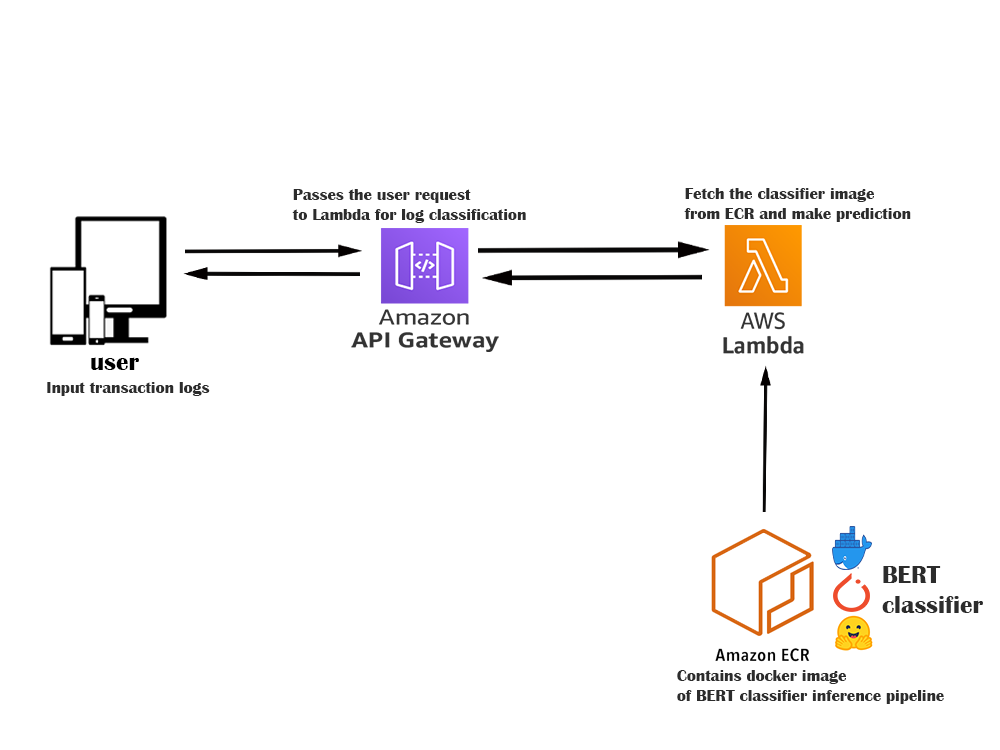
Our complete API architecture is as shown above, here a user makes an API request with one of his daily transaction logs and this log gets passed through AWS API gateway, this request would then fire up the Lambda Function. For our initial request the lambda starts a 10GB pod and fetches the docker image from ECR to start our classifier container. The docker image comprises of a model and inference script (saving themodel in object storage is a better approach but for now we can go with this approach for simplicity). So based on the user query the lambda function performs model inference and returns a final transaction class as shown below:
Since I have explained the whole process, now we can get our hands dirty with code . I won’t be explaining about the whole BERT classifier model training pipeline, cause that is not the purpose of this blog. You can checkout my colab notebook to train user log classification model . After the training process is complete you will get a pytorch_model.bin file which we will be using as our model for building our serverless API.
Now we are going to create a python lambda function using serverless CLI command
The above command will create a simple boilerplate with a basic python handler script, serverless.yml, requirements.txt ..etc. Since we are building a Deep Learning text classification model using pytorch framework we need some packages that needs to be installed, so let’s add them to our requirements.txt. Since we are not leveraging GPU for inference we could go with a minimalist pytorch cpu version to save up storage.
Now let’s jump directly into our handler function, The Lambda function handler is the method in your function code that processes events. When your function is invoked, Lambda runs the handler method. When the handler exits or returns a response, it becomes available to handle another event. Our handler code is as follows:
In the above code the sentence_prediction() method takes in the user input, preprocess, tokenize and pass to the trained BERT model, which in turn returns the final prediction. Currently the function returns the prediction class with highest confidence score. You can checkout the inference code here
Now we are all set to test out our inference API locally using docker. Make sure docker is installed on your local machine to test the API, please checkout the docker installation guide. Dockerfile is as follows:
Now let’s build our docker image and run our container for testing
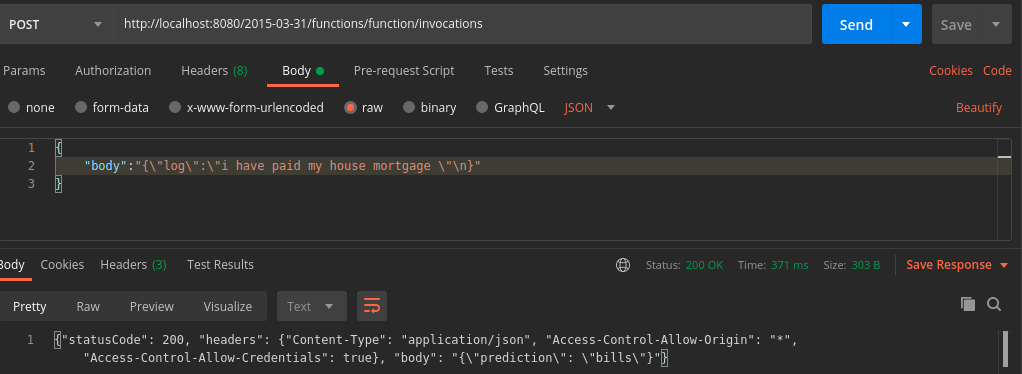
We are now ready to test out our API locally.
The URL endpoint should be of the following format. {hostname}/{lambda-api-version}/functions/function/invocations
If it’s working in docker then it should be working everywhere else,so most of our work is done. In order for the Lambda function to fetch this image it should be deployed to AWS ECR(Elastic container registry). As the first step we need to create a repo to save our docker image, this can be done programmatically using AWS CLI as follows:
In order to push our image, we first need to login to ECR from our machine and this requires some identifiers like AWS region and AWS account id which we can get from AWS IAM.
We can now login to ECR using the following command:
Before pushing our image to ECR, we need to keep in mind that by default all docker images are pushed to Docker Hub, but here we need to push it to AWS ECR for lambda function to fetch our image. For that we need to tag or rename it to a format so that it will be pushed to its respective ECR repo. The format for this is as follows:
{AccountID}.dkr.ecr.{region}.amazonaws.com/{repository-name}
Let’s check our docker image list using “docker image ls” command, we will be able to see a docker image with the above format tag. Now we are all set to push our image to ECR.
We have reached the final stage of our tutorial, that is to deploy AWS Lambda using our custom image. Now we have to edit our serverless.yml file, which was created as a boilerplate file when we created our lambda function. The following yml file let’s you configure the AWS resources that needs to be fired up when deploying our lambda function.
ECR makes our life super easy here, since we only need to pass the url path and digest path so that lambda could pull our locally tested image when starting up the service. We can get the URL path by either using AWS CLI or we can directly copy it from ECR console, digest can be found inside the newly created repo. Make sure to replace image PATH with our own respective URL path and digest.

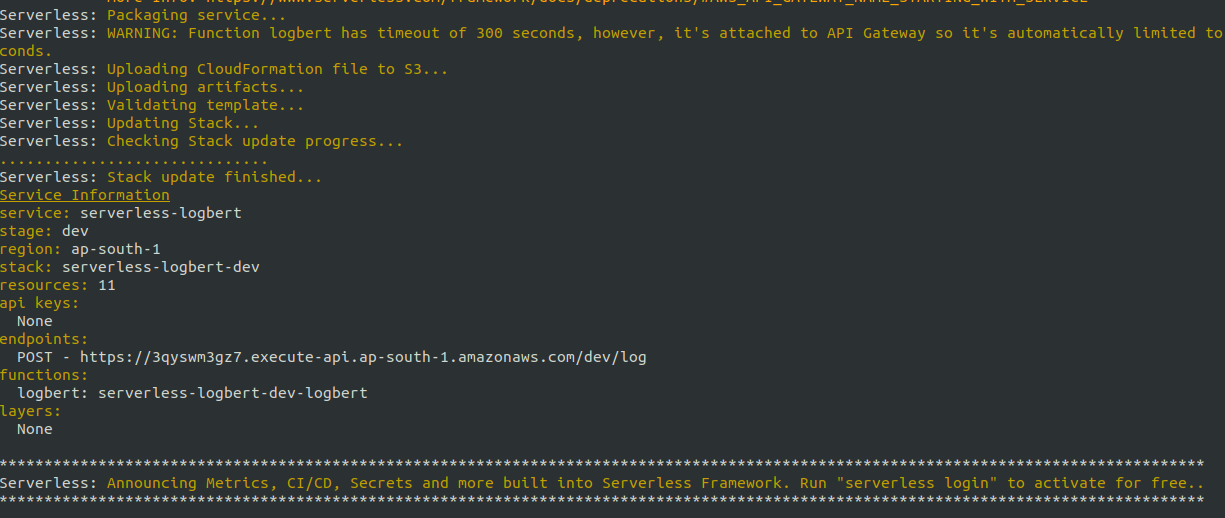
Now we are all set to deploy our lambda function using the following command:
The above command would fire up all the resources like AWS API gateway, lambda function, s3 bucket ..etc using AWS CloudFormation which are required for the API to function. Once the deployment process is completed we will get some logs as shown below
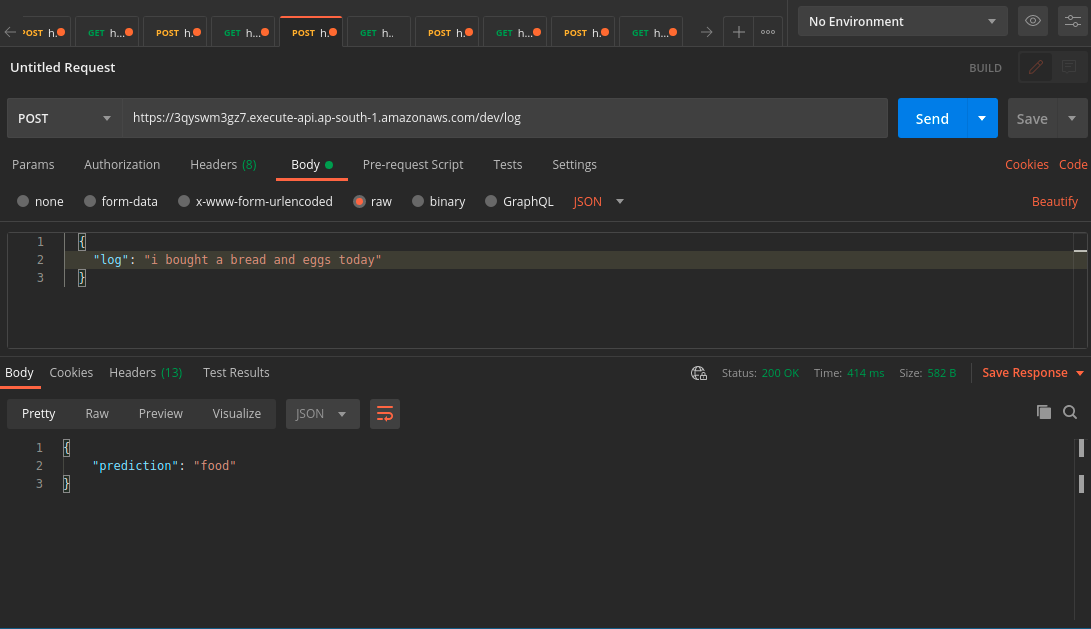
We are almost done 😁 now let’s do the fun part. Yes, to test our newly built API. Let’s again go back to Postman and use the URL that we got from the above serverless deployment log and test it out.
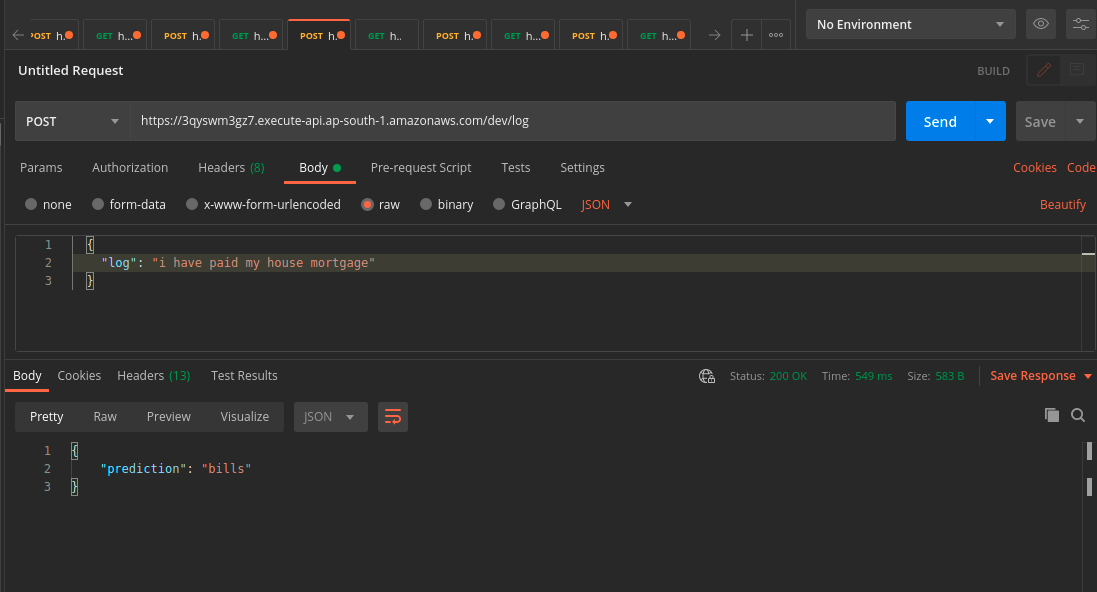
Yes!, it worked as expected and took only half a second to fetch the response, that too with CPU inference.
This serverless API infrastructure has its fair share of pros and cons, the biggest perk being that It will automatically scale up to thousands of parallel requests without any issues. So we don’t have to worry about building a scalable and robust architecture on our own (Means no one is gonna call you out in the middle of the night to fix up server overloads 😴 🤯).
At the same time it’s not very suitable for building production ready mission critical API due to cold start problem, but this can rectified to some extend by using AWS CloudWatch to keep our lambda service warm. GPUs are currently not available for AWS lambda which is a big disappointment 😞 for all Deep Learning folks, we can hope to see such features in the future iteration.
The future looks bright for serverless infrastructure when it comes to building AI based MVP (Minimum Viable Products) in a very cost effective way.
I hope you guys find this post useful. Always open for suggestions and criticisms. Thanks😁